Sunday, December 28, 2014

Adding Robots Files to your Web Site - Web Spiders


In this article we see step by step adding Robots Files to your Web Site. Web Spiders are usually called "Robots", and at the moment of accessing a web page, they are called "User-agents".
A Robots file is a suggestion or request made by you to the Web Spider, to not to index certain files or folders in your web site.
It is important to realize that the directives inside the resultant Robots.txt file are purely advisory for the web crawlers.
Adding Robots Files to your Web Site - Web Spiders


Adding Robots Files to your Web Site


Before we see step by step how to make a Robots file, take a look at the basics of the Robots syntax with this examples:

all robots can enter all files:
User-agent: *
Allow: /


all robots cannot enter some files:
User-agent:*
Disallow:/file1.aspx
Disallow:/file2.html


all robots cannot enter some directories:
User-agent:*
Disallow:/PrivateDirectory/

some robots cannot enter some directories:
User-agent:SomeRobot
Disallow:/PrivateDirectory/

After this short introduction, let's add a Robots file.

Adding Robots Files to your Web Site - Web Spiders


Open the IIS (CTRL-R + "inetmgr") , then open your web site and click on the SEO - Search Engine Optimization:

Adding Robots Files to your Web Site - Web Spiders 1

First you have to add a Sitemap, if you don't have one:
Adding Robots Files to your Web Site - Web Spiders 2

After you created a new Sitemap, click on "Add a new disallow rule":
Adding Robots Files to your Web Site - Web Spiders 3

Here select the URLs of the files and directories that you don't want to index:

Adding Robots Files to your Web Site - Web Spiders 4

For example:

Adding Robots Files to your Web Site - Web Spiders 5

Now let's add the request to index our web site:


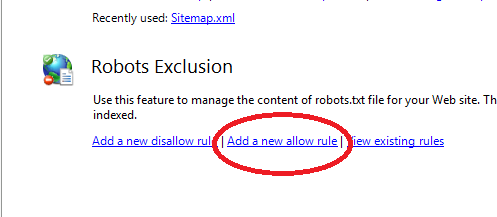
Select the whole web site to be indexed:

Adding Robots Files to your Web Site - Web Spiders 6


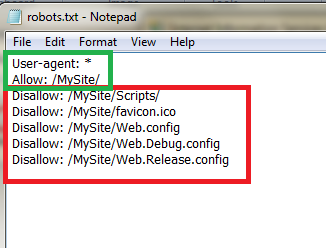
Now let's see our rules:

Adding Robots Files to your Web Site - Web Spiders 7

As you see, ALL User-agents are ALLOWED to index our site, except for the Disallow rules:

Adding Robots Files to your Web Site - Web Spiders 8

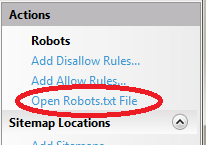
Now let's see the txt file just automatically created:

 It looks as this:


That's all!!!! The same way, you could select all files or folders for exclusion from indexers.

You can learn about the free IIS SEO Toolkit , and how to install, analyze and optimize your web site, in this tutorial.


By Carmel Shvartzman


עריכה: כרמל שוורצמן

Monday, December 15, 2014

Powerful open-source Web Editor optimized for Web Design


In this article we describe Step by Step How to install Brackets , a Powerful open-source Web Editor optimized for Web Design.  
Brackets is a FREE web editor fully written in Javascript, CSS3 and HTML5, and therefore extensible by a Web programmer like you. It comes with very cool features like a Quick Edit (you can edit the CSS3 & JS code just from  some HTML file, with no need at all to switch between different source files) , and a Live Preview , meaning that you can preview your Web App on the browser and run it from the code editor.
Brackets looks this way:
Powerful open-source Web Editor optimized for Web Design


Powerful open-source Web Editor optimized for Web Design


To install Brackets , browse to Brackets and download the free designer :
Powerful open-source Web Editor optimized for Web Design 1

Get the latest version to your machine:

Powerful open-source Web Editor optimized for Web Design 2

Powerful open-source Web Editor optimized for Web Design 3


Powerful open-source Web Editor optimized for Web Design 5

After the installation, open the Brackets web designer and take a look to the Plugins that you can append to it: for example, look for the SPA AngularJS enhancements of this Web Designer, clicking the "Extensions Manager" button to the top right side :

Powerful open-source Web Editor optimized for Web Design 7

Proceed to install all Plugins that you want, for instance, the "AngularJS for Brackets" and "Angular JS Snippets" ones.
A very useful feature of Brackets is the "Live Preview" , which allows us to immediately run the HTML5 page, and update it as you type code without hitting "save", without switching to the browser, and without refreshing it :

Powerful open-source Web Editor optimized for Web Design 8

Another very powerful and useful feature is the "Quick Edit", mean to edit the CSS and script source files without switching to them, but placing the cursor on some HTML tag with CSS definitions, and right clicking  "Quick Edit" (Ctrl + E) :

Powerful open-source Web Editor optimized for Web Design 9

You can then see the source file name (main.css) and edit the source code, without leaving the HTML file:

Powerful open-source Web Editor optimized for Web Design 10

After you finish the editing, press "ESC" or click the "X" to close the dialog.
There is also a powerful "Search" engine:

Powerful open-source Web Editor optimized for Web Design 11

Another useful thing is the thumbnail of the color or gradient as you hover over some HEX or RGB values:

Powerful open-source Web Editor optimized for Web Design 12

You can also open the Developer Tools from Brackets:

Powerful open-source Web Editor optimized for Web Design 13


Powerful open-source Web Editor optimized for Web Design 14

Enjoy your modern and powerful Web code editor:

Powerful open-source Web Editor optimized for Web Design 15


In this article we learned Step by Step How to install an optimized Web code editor and designer. 
Happy programming.....

      by Carmel Schvartzman


כתב: כרמל שוורצמן

Sunday, November 30, 2014

How to get 50 GB of FREE High-speed Secure Storage on the Cloud


This post is about How to get 50 GB of FREE High-speed Secure Storage on the Cloud, using the Mega storage service , which is very fast and very secure, and count as the more big , fast and secure FREE Cloud Storage by the date we're writing this article.
We'll use the 50 GB FREE cloud storage offer from Mega , not just because it's fast and secure, but also because it can synchronize folders on our machines, and because has private encryption, deleted files recovery, files versioning, and also offers very good mobile apps.
By the time we write this, Dropbox and SpiderOak  are offering 2 GB of free storage, Box 10 GB, Google 15 GB   shared between Gmail, Google Drive and other services, Microsoft's OneDrive (SkyDrive) and Copy (Barracuda Networks) offer also 15 GB, and BitCasa just 20 GB .
Tencent Weiyun is now offering 10 TB free storage , and you can take a look at their web site. But at first the UI is in chinese, and security matters are far more developed on Mega.
As Dropbox and other storage services, Mega has a folder's synchronization virtual drive, but it's better since it can be configured to synchronize not only one single folder, but any folders we want.
At Mega Storage Cloud, we can share any folder to whoever we want,  also setting permissions  for readonly, readwrite or full access. This way, we can give read-write permissions to a co-worker, which will be required to have another (FREE) Mega account. However, if we intend to share publicly some file, this won't require the downloaders to hold Mega accounts.
The Mega Storage Cloud is very fast: there are reports of 10 Mbps for uploadings, and ~30 Mbps for downloadings.
Mega security is far stronger than other Cloud Storages: all files and data are stored fully encrypted in the cloud , and they are decrypted only in the downloader machine, yours or whoever's you shared your data with. The master encryption key is based on your personal password: be very careful to save it in a safe place, because if lost, all your data is lost.
Restoring deleted files is as easy like to selecting them from the "Rubbish Bin", where our deleted files are kept, and selecting restore.
How to get 50 GB of FREE High-speed Secure Storage on the Cloud


 How to get 50 GB of FREE High-speed Secure Storage on the Cloud


First , we create a FREE personal account in the Mega web site:
How to get 50 GB of FREE High-speed Secure Storage on the Cloud 1

How to get 50 GB of FREE High-speed Secure Storage on the Cloud 2


How to get 50 GB of FREE High-speed Secure Storage on the Cloud 3


Then, you'll have to confirm your account from your email personal account:


How to get 50 GB of FREE High-speed Secure Storage on the Cloud 4


You can select the FREE 50 GB account, or some account more suited to your necessities:

How to get 50 GB of FREE High-speed Secure Storage on the Cloud 5


After you confirmed your account, you are exposed to the Mega UI:


How to get 50 GB of FREE High-speed Secure Storage on the Cloud 6

The "Cloud Drive" is the place where all our files are stored. The "Rubbish Bin" is where our deleted files are saved, and the "Contacts" are the emails of the people which we shared files with:


How to get 50 GB of FREE High-speed Secure Storage on the Cloud 7


You then can proceed to you first upload.


How to get 50 GB of FREE High-speed Secure Storage on the Cloud 8

You'll be surprised of the speed and security of this Cloud Storage.

 Enjoy!!!!


By Carmel Shvartzman

עריכה: כרמל שוורצמן

Saturday, November 29, 2014

Step by step how to send an HTTP PUT Request to a RESTful WCF Service using Fiddler

In this post we'll learn how to send an HTTP PUT Request to a RESTful WCF application using Fiddler
We'll use Fiddler to test an RESTful WCF application, sending an HTTP PUT request. We'll start with a working WCF application,  and we'll update an entry using Fiddler, showing as follows :


First of all, we have to download the FREE Fiddler tool from this web site :


After installing it , study the settings of the Operation Contract at the WCF Service Contract, in order to fill exactly what it is expecting as a request:
http put request to restful wcf using fiddler

The WebInvoke handles the PUT HTTP verb, and the request format must be JSON, and so the response format. Therefore, we'll send exactly what the WCF wants.
Open Fiddler and click the "Composer" option:


Then type in the URL and select "PUT" HTTP request method from the list. Also, set the request Headers as follows: (don't worry about the Content-Length, because Fiddler will fill  it for you):


Also, fill the Request Body :  be careful to fill adequately the field names of the Entity you want to update, most of all, the ID of the record to change.

Press the "EXECUTE" button at the Fiddler Composer, to send the request. If you set a breakpoint inside the WCF HTTP PUT handler, you'll see the bindings in action :


As you see, WCF succeeded at binding the JSON it got with the Blog object expected.
The response is then sent to Fiddler, with an "true" value:


And the database shows the updated values:


If you want to take a look at the RESTful WCF which we're using here, see this tutorial.

That's all... 
In this tutorial we've learned how to send an HTTP PUT Request to a RESTful WCF application using Fiddler. 
Happy programming.....
      By Carmel Shvartzman
כתב: כרמל שוורצמן


Wednesday, November 26, 2014

How to use ExecuteStoreQuery with parameters on the Entity Framework


This tutorial is an example of  How to use the ExecuteStoreQuery method with parameters on the  Entity Framework, thus directly executing SQL commands against the Model Data Source.
We'll use a stored procedure that takes in a string parameter and returns some records, which we'll store inside a generic List<>. Using SQL commands or stored procedures is an effective way to retrieve only the records that you need, instead of fetching ALL the table data, to apply on it some kind of filtering using Where() or Single() methods, with all the performance costs that this later imply.

We'll exemplify running commands against the database on two ways:
1) using Stored Procedures
2) using an SQL command


 How to use ExecuteStoreQuery with parameters on the Entity Framework


1) For our first example, we create a stored procedure which takes a parameter and return three records using the received argument:

How to use ExecuteStoreQuery with parameters on the Entity Framework


Next, we define an SqlParameter for sending some text to the procedure:
How to use ExecuteStoreQuery with parameters on the Entity Framework 1

 SqlParameter p_code = new SqlParameter("code", "TEST");
            List<string> resultComplaintStateCode =
                                (from c in  Context
                                     .ExecuteStoreQuery<string>("GetText @code" ,p_code
                                 )
                                 select c).ToList();


 Notice that we use Linq to insert the returned records inside a generic List<> :

How to use ExecuteStoreQuery with parameters on the Entity Framework 2


Is really straightforward. However, if you use ExecuteMethodCall() method instead of ExecuteStoreQuery(), you'll need to update the Entity Framework Data Model, importing the stored procedure:
How to use ExecuteStoreQuery with parameters on the Entity Framework 3


How to use ExecuteStoreQuery with parameters on the Entity Framework 4


2) As the ExecuteStoreQuery method's name implies, we can also use it to execute some SQL command against the database.
For instance, let's copy the same SQL code from the stored procedure, and execute it directly from the C# code:
How to use ExecuteStoreQuery with parameters on the Entity Framework 5


 As you see, the SQL command was executed according to the three parameters that we sent :

How to use ExecuteStoreQuery with parameters on the Entity Framework 6


That's all!!!!


By Carmel Shvartzman

עריכה: כרמל שוורצמן