By Carmel Schvartzman
In this tutorial we'll learn how to create an Ajax enabled Master-Details WebGrid with CRUD functionality in MVC 4 , using a Partial View . The parental Grid will expose data dynamically loaded from database and sent by the Action method from the web server, and will offer CRUD (Create Retrieve Update Delete) functionality. Also, the Grid will send Ajax requests for paging, sorting and displaying related data in a Details <TABLE> grid.We'll want to create a Master-Details grid with CRUD functionality , showing as follows:

This tutorial will use data fetched from the Entity Framework, exposing the following classes:

For each Blog Posts selected in the Master webgrid, we'll display all the related Comments in a subsidiary Details grid.
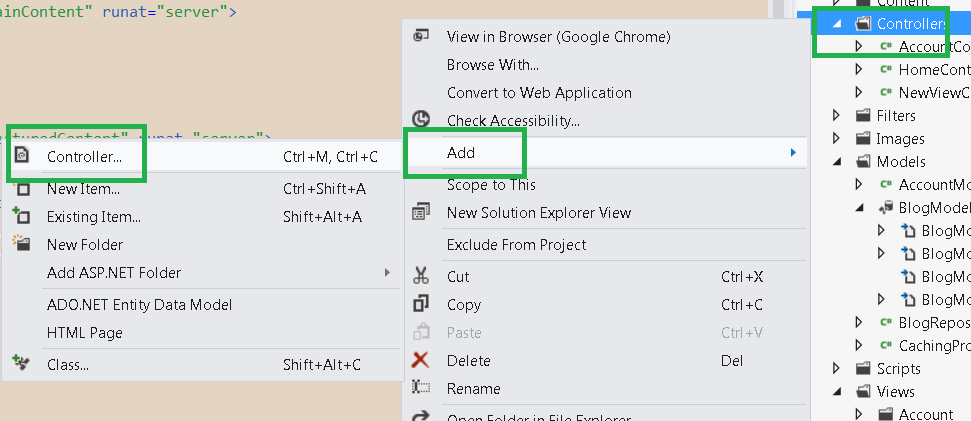
To create the Master WebGrid we must create our own View, and it will not be difficult if we take advantage of the Scaffolding capacities of the MVC environment. So first let's create a new Controller called "BlogController", automatically creating the necessary Views to cope with the CRUD functionality requirements. So right click over the Controllers folder, and add a new Controller:
Name it "BlogController", and select the template "MVC Controller with read/write actions and views, using Entity Framework":
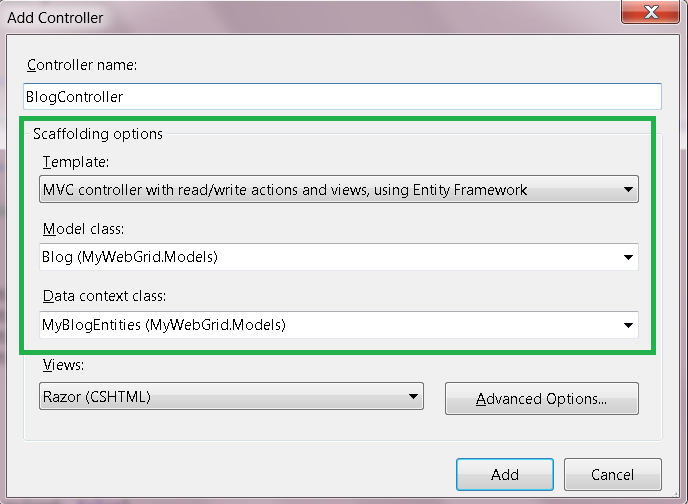
The Context to use will be of course the one you named while creating your Entity Framework Data Model, and the Model will be the Blog class, because we'll be creating, updating and deleting Blog objects.
After you create the Controller, open it and take a look at the Action Methods created for you: there are action methods for displaying the list of Blog posts (Index method), to create new ones , to update them, and to delete:


Open the Views folder and see the Views that were created for you:

First of all, let's add a link to the _Layout .cshtml file Menu, in order to browse to the Blog web page from the Home page:

Build and run without debugging(CTL-F5) your app. Then press the link "See All Posts" from the Menu:
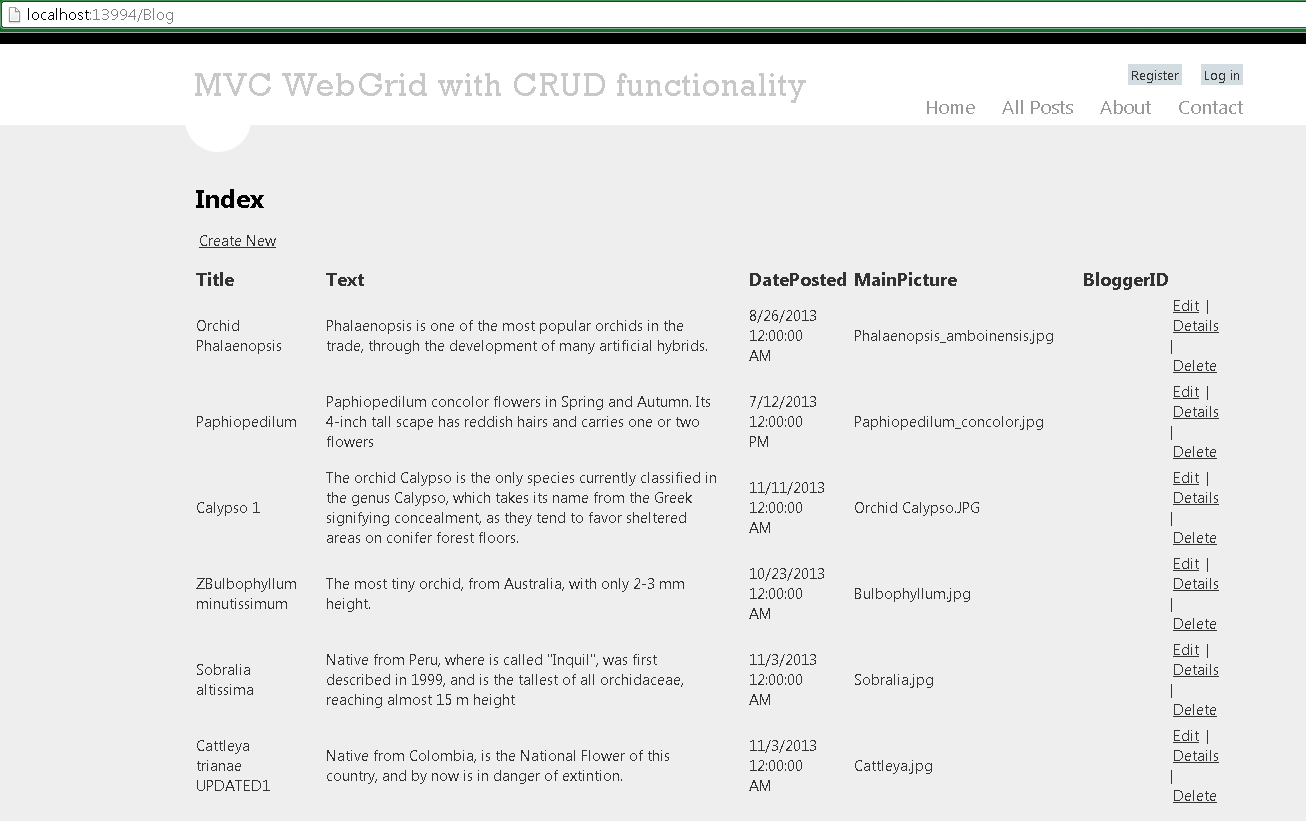
We got a list of the posts in the shape of an HTML table. Click the Create link:

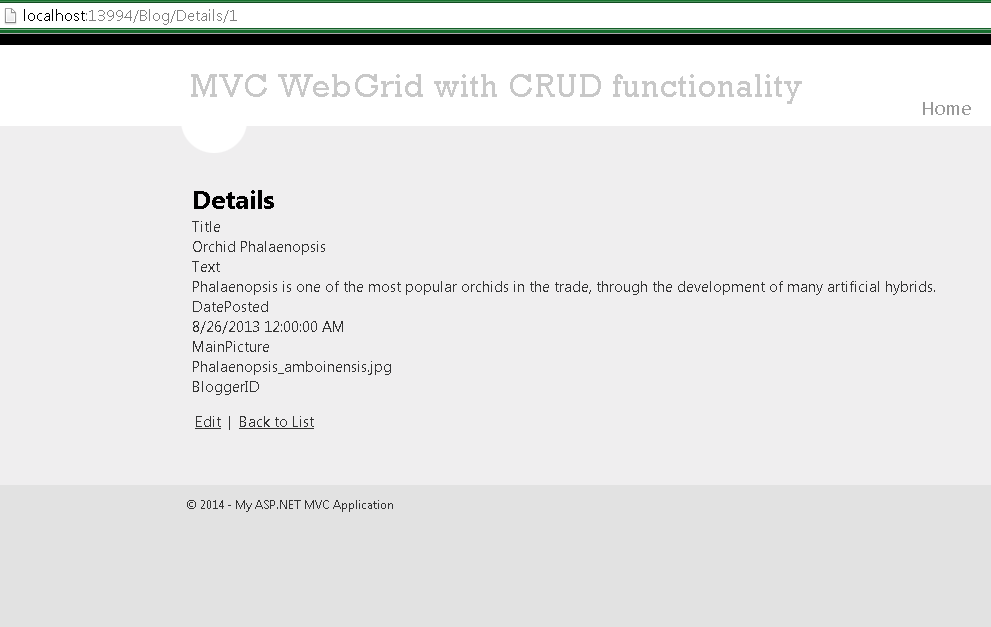
Return to the list and press the Details link:
Now do the same , and press Edit:

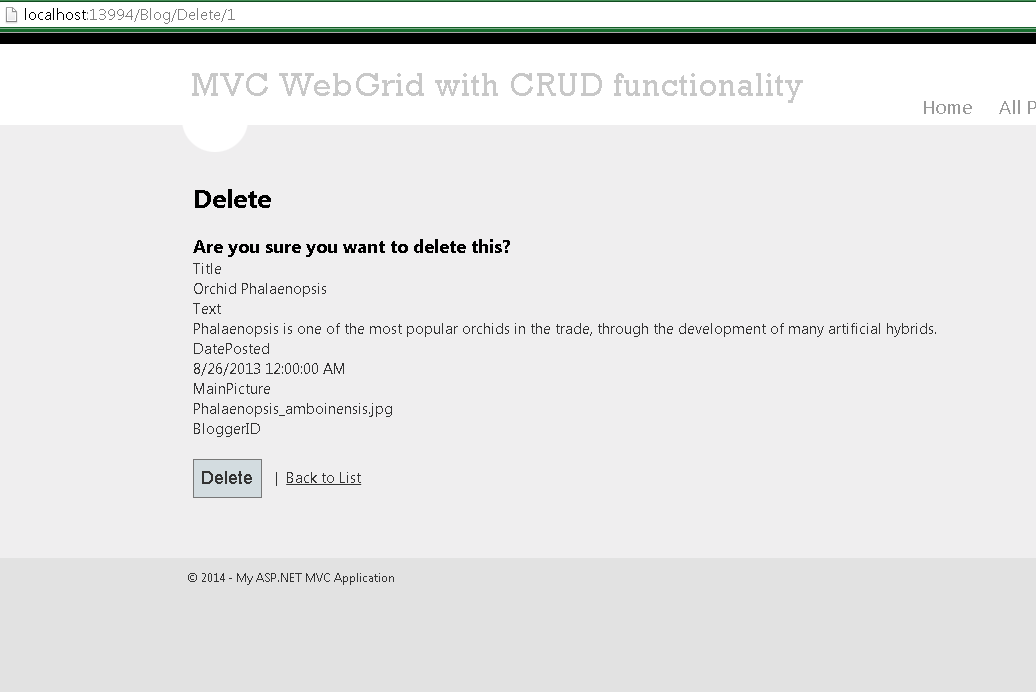
And now Delete:
As you see, we got all CRUD functionality. But now we want a WebGrid with paging-sorting capabilities, instead of a table. So we'll replace the <TABLE> with an WebGrid Html Helper: open the Index View:

And comment the whole <table> tag:

Next, we'll instantiate a WebGrid, using an overload of the extension method with the following parameters:

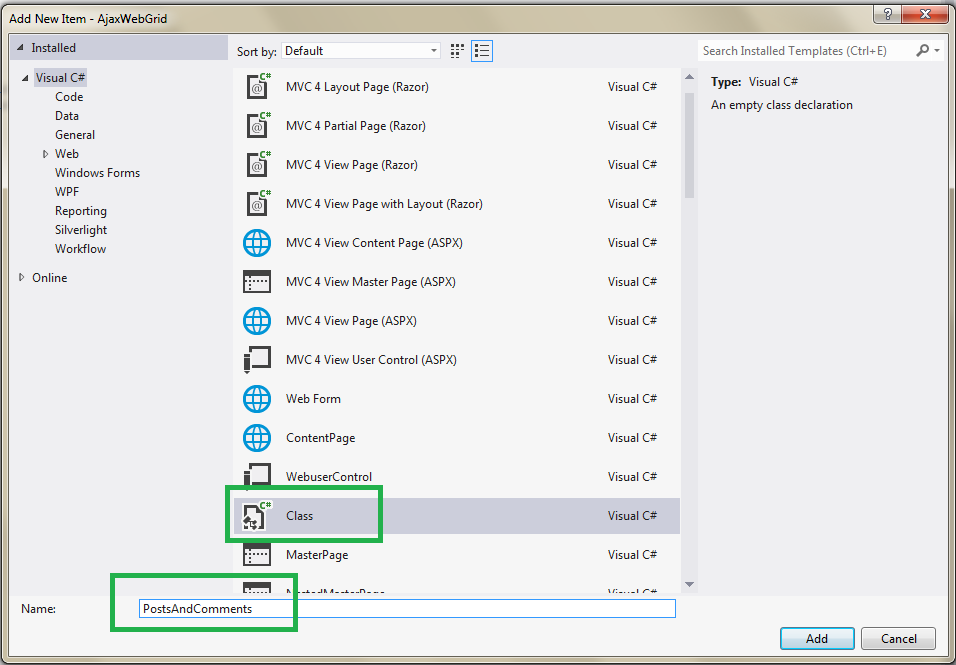
Because we'll have TWO grids displayed on the View, we need two Lists<> in the Model. For that sake, we'll create a new class in the Models folder, containing both the Blog Posts and the Comments lists:

We'll name the new class "PostsAndComments":
Inside the class, we create two generic lists holding both Posts and Comments:

And now , replace the code inside the "Index" action method of the BlogController, in order to populate the two lists and send them as the Model to the Index View:

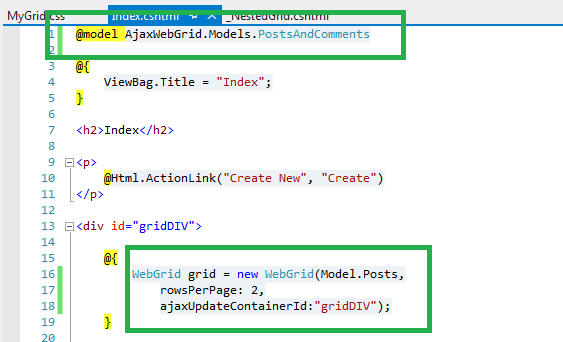
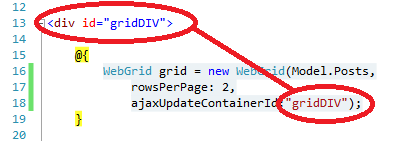
Back to the Index View, replace the @model directive, create a <DIV> enclosure for the WebGrid to be Ajax replaced, and type the final code for the WebGrid will set as its arguments the data included in the Model.Posts (an IEnumerable<Blog>), the number of rows to display in each page (2) , and the container to be updated by the Ajax requests :
Now we display the markup of the WebGrid using the GetHtml() WebGrid method, including styles, and formatting the date and picture fields. Also we set the "Title" column as the one acting as the SELECTOR that will be clicked by the user in order to see all related Comments:

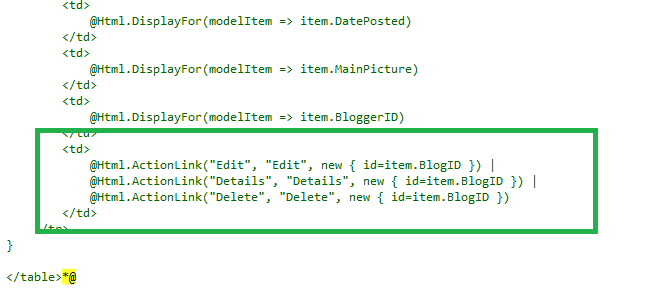
We automatically got the paging and sorting WebGrid functionalities. We also got all CRUD functionality that was there before: deleting, editing , and so, by copying the CRUD block that you commented before:
Add a new .css stylesheet file to the "Contents" folder:

Name the .css as GridStyle:

In the stylesheet we include all the style for the WebGrid, footer, header, hyperlinks, even the style for displaying adecuately the pictures:

The code (to copy-paste) is the following:

And we also add a reference to the JQuery javascript file, in order to enable the Ajax functionality:

Buid (F6) and run your app (CTL-F5) , to get this presentation UI:

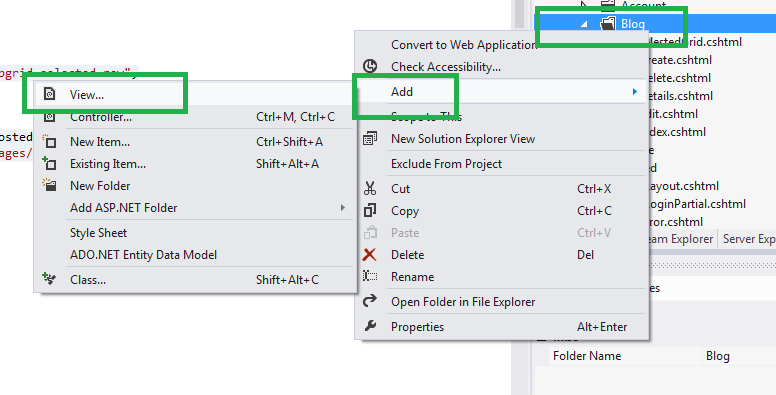
Now we want a Partial View in order to display the Details grid, containing the Comments for the selected Post. Add a new View to the Blog View folder:
Set the Partial View scaffolding it as a List of Comments:

Inside the Partial View we got, there are two code areas automatically created, but which we don't need: the "Create" link and the "Edit" buttons, so delete it:

Also, replace the string to be displayed as a title, with "Comment Title" :

Now return to the Index View, to add the code that will display the Partial View. What we do is to check that some row has been selected in the WebGrid, and then we fetch the selected row, in order to get the ID of the chosen Post.
If the row is not null, we use that ID to a Where() clause operating on the second List<> we got inside the Model (the Comments List<>) and that way we got all related comments for that post. Then , we execute RenderPartial() sending the filtered List<Comments> to our Partial View:

Save and refresh the browser:
Now select the Title of some post:
Because we'll have TWO grids displayed on the View, we need two Lists<> in the Model. For that sake, we'll create a new class in the Models folder, containing both the Blog Posts and the Comments lists:
We'll name the new class "PostsAndComments":
Inside the class, we create two generic lists holding both Posts and Comments:
And now , replace the code inside the "Index" action method of the BlogController, in order to populate the two lists and send them as the Model to the Index View:
Back to the Index View, replace the @model directive, create a <DIV> enclosure for the WebGrid to be Ajax replaced, and type the final code for the WebGrid will set as its arguments the data included in the Model.Posts (an IEnumerable<Blog>), the number of rows to display in each page (2) , and the container to be updated by the Ajax requests :
Now we display the markup of the WebGrid using the GetHtml() WebGrid method, including styles, and formatting the date and picture fields. Also we set the "Title" column as the one acting as the SELECTOR that will be clicked by the user in order to see all related Comments:
We automatically got the paging and sorting WebGrid functionalities. We also got all CRUD functionality that was there before: deleting, editing , and so, by copying the CRUD block that you commented before:
Add a new .css stylesheet file to the "Contents" folder:
Name the .css as GridStyle:
In the stylesheet we include all the style for the WebGrid, footer, header, hyperlinks, even the style for displaying adecuately the pictures:
The code (to copy-paste) is the following:
.webgrid-tableFinally we add a <link> tag inside the _Layout file, to include the .css in the Index View:
{
font:italic 11px Verdana;
width: 100%;
display:grid;
border-collapse: separate;
border: solid 1px #98BF21;
background-color: #f0c9a0;
padding: 5px 5px 5px 5px;
}
.webgrid-header th
{
background-color: #c67f1c !important;
color: #FFFFFF !important;
font: 900 14px Verdana !important;
padding:5px 5px 5px 5px;
text-align: center;
}
.ActionsTH
{
background-color: #c67f1c !important;
color: #FFFFFF !important;
font: 900 14px Verdana !important;
padding:5px 5px 5px 5px;
text-align: center;
width:180px;
}
.webgrid-footer, .webgrid-footer a
{
background-color: #c67f1c;
color: #FFF;
font: 900 14px Verdana;
padding:3px 3px 3px 3px;
}
.webgrid-alternating-row
{
background-color: #e5d773;
padding:5px 5px 5px 5px;
}
.title-column
{
font:900 13px Verdana;
text-align:center;
}
.webgrid-img
{
width: 150px;
height: 150px;
}
.webgrid-selected-row
{
background-color: #dca116;
font:900 13px Georgia;
}
And we also add a reference to the JQuery javascript file, in order to enable the Ajax functionality:
Buid (F6) and run your app (CTL-F5) , to get this presentation UI:
Now we want a Partial View in order to display the Details grid, containing the Comments for the selected Post. Add a new View to the Blog View folder:
Set the Partial View scaffolding it as a List of Comments:
Inside the Partial View we got, there are two code areas automatically created, but which we don't need: the "Create" link and the "Edit" buttons, so delete it:
Also, replace the string to be displayed as a title, with "Comment Title" :
Now return to the Index View, to add the code that will display the Partial View. What we do is to check that some row has been selected in the WebGrid, and then we fetch the selected row, in order to get the ID of the chosen Post.
If the row is not null, we use that ID to a Where() clause operating on the second List<> we got inside the Model (the Comments List<>) and that way we got all related comments for that post. Then , we execute RenderPartial() sending the filtered List<Comments> to our Partial View:
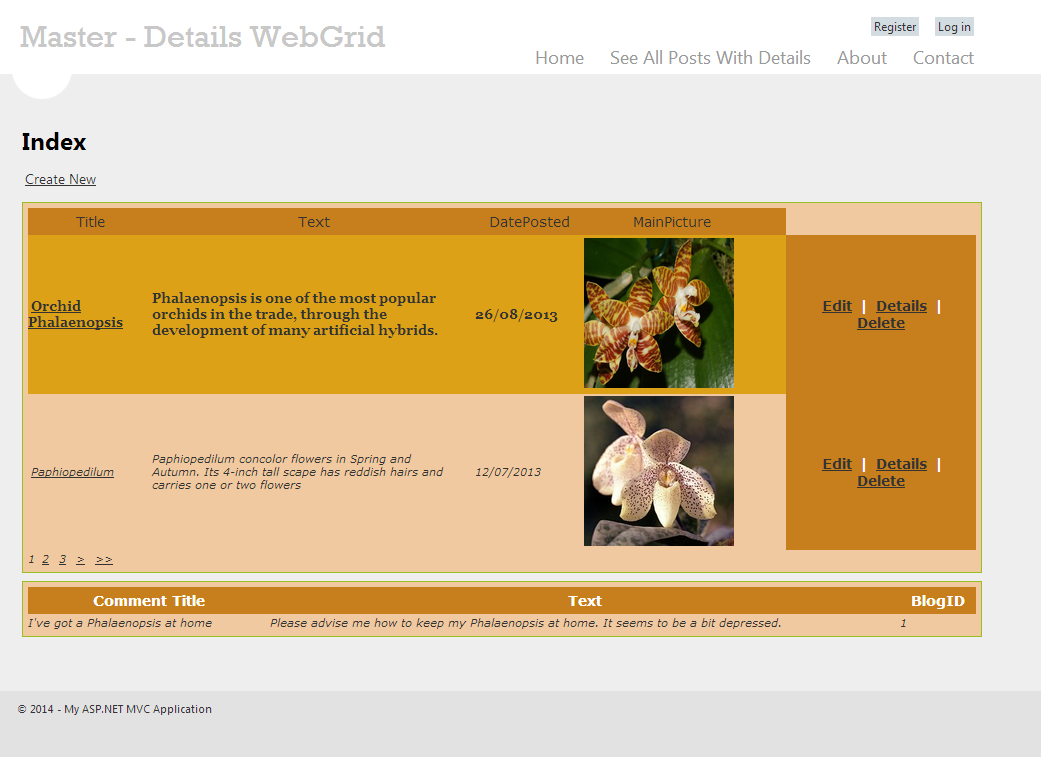
Save and refresh the browser:
Now select the Title of some post:
We got all the Comments for that post. Notice that you can do paging, so choose another page and select some post:
Also the records are sorted by Title, ascending. Click on the headers of the WebGrid to sort them by date or text, or try to invert the sorting to be descending:

As you can see, because we've already added Ajax support for the grid, we got no flickers while sorting, paging or seeing the comments. Therefore, the grid is refreshed accordingly without refreshing the whole web page:

Also, when there is a posts with no comments, the Details grid is displayed empty.
In this tutorial we've learned how to create an Ajax enabled Master-Details WebGrid with full CRUD functionality in MVC 4 , using a Partial View .
That's all!!
Happy programming.....
Also the records are sorted by Title, ascending. Click on the headers of the WebGrid to sort them by date or text, or try to invert the sorting to be descending:
As you can see, because we've already added Ajax support for the grid, we got no flickers while sorting, paging or seeing the comments. Therefore, the grid is refreshed accordingly without refreshing the whole web page:
Also, when there is a posts with no comments, the Details grid is displayed empty.
That's all!!
Happy programming.....
כתב: כרמל שוורצמן
No comments:
Post a Comment