In this tutorial we'll make use of the JavaScript Carousel Plugin of the Bootstrap.
We suppose you have installed the Twitter Bootstrap in your MVC app. If you don't, learn in this tutorial how to setup.
In just 5 minutes we'll build a responsive web page using the Carousel Widget Component of the Twitter Bootstrap :

The Twitter Bootstrap can be reached & downloaded from the Bootstrap official site : Bootstrap :

Create an HTML web page or an MVC View, but make sure to load the CSS and the .js jQuery scripts in the page:


TWITTER BOOTSTRAP CAROUSEL Widget
Go to the Bootstrap and copy the Carousel Widget markup :

Then paste it inside your MVC View or your HTML page, making the necessary changes to customize the Carousel to your App. I remarked in red the essential properties to declare , in order to transform the <div>s into a Carousel. You can COPY-PASTE this customized Carousel markup :
<div id="carousel" class="carousel slide col-lg-4" data-interval="2000" data-ride="carousel"> <ol class="carousel-indicators"> <li data-target="#carousel" data-slide-to="0" class="active"></li> <li data-target="#carousel" data-slide-to="1"></li> <li data-target="#carousel" data-slide-to="2"></li> <li data-target="#carousel" data-slide-to="3"></li> <li data-target="#carousel" data-slide-to="4"></li> <li data-target="#carousel" data-slide-to="5"></li> </ol> <div class="carousel-inner" > <div class="item active"> <img src="Images/Bulbophyllum.jpg" alt="Bulbophyllum" /> <div class="carousel-caption"> <b>Bulbophyllum</b> </div> </div> <div class="item"> <img src="Images/Cattleya.jpg" alt="Cattleya" /> <div class="carousel-caption"> <b>Cattleya</b> </div> </div> </div> <a class="left carousel-control" href="#carousel" role="button" data-slide="prev"> <span class="glyphicon glyphicon-chevron-left"></span> </a> <a class="right carousel-control" href="#carousel" role="button" data-slide="next"> <span class="glyphicon glyphicon-chevron-right"></span> </a> </div>
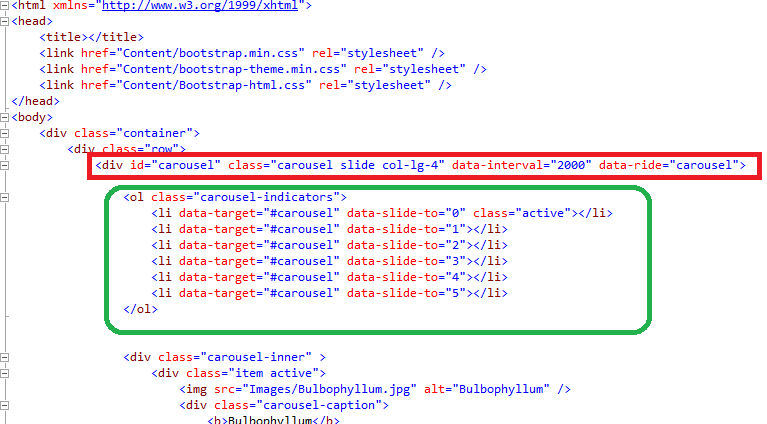
As you see, we declare a "carousel slide" class, and define a data-interval in milliseconds, and a data-ride to start the animation on page load. Then we define an <OL> "carousel-indicator" , which exactly the number of slides in the carousel-inner <div>. Finally, we create the Carousel controls as follows:

If the size of the pictures is very varied, you can set it in your CSS as follows:
img { width:390px !important; height:360px !important; }
Save & refresh the web page :


And of course, the Carousel is perfectly responsive in mobiles and tablets:

That's all!! In this tutorial we've learned how to use the Carousel Widget Component of the Twitter Bootstrap as a Menu.
Happy programming.....
By Carmel Schvartzman
By Carmel Schvartzman
כתב: כרמל שוורצמן
No comments:
Post a Comment