Wednesday, August 20, 2014

Step by step OData REST Service with MVC Web API


In this article we'll create an OData RESTful Service using the WebAPI  inside an Asp.Net MVC application , with support for GET operations. A wider  tutorial about how to create a Web API OData v4.0 Service with support for all the CRUD operations (Create - Retrieve - Update - Delete), can be seen here 

For this tutorial, we'll  create a Web API and enable it as a RESTful OData application, to handle HTTP  GET requests.   
We'll create our RESTful OData Web API from scratch in 3 simple steps:
1) create an MVC app & install/update Web API and OData assemblies
2) create the data Model;
3) create an ApiController and set the "Queryable" attribute over the Action Methods

The REST architecture enables handling HTTP requests according to several verbs: GET is for reading data, POST is for creating a new record, PUT is for updating ALL the fields of some record, PATCH (or PUT again) is for updating partially some record, and DELETE is for erasing a record.

At this example we'll use an XML file where the data is stored, and we'll expose it using the OData protocol, supporting of course sorting ($orderby)  and paging ($skip & $top) :


1) Step #1 : create an MVC app & install/update Web API and OData .dlls:

First, create a new EMPTY Asp.Net MVC Application:


Then, UPDATE the Web API references, by opening the NuGet Console and typing :
Update-Package Microsoft.AspNet.WebApi -Pre


Next, install the OData package by typing:
Install-Package Microsoft.AspNet.WebApi.OData -Version 5.0.0


2) Step #2 : create the data Model : 


 public class Note
    {
        public int ID { get; set; }
        public string To { get; set; }
        public string From { get; set; }
        public string Heading { get; set; }
        public string Body { get; set; }
        public Note()
        {

        }
        public Note(int ID, string To, string From, string Heading, string Body)
        {
            this.ID = ID;
            this.To = To;
            this.From = From;
            this.Heading = Heading;
            this.Body = Body;
        }
    }

Important: you MUST declare a parameterless constructor in your model, because the serializer will need it to render the data at the Controller.

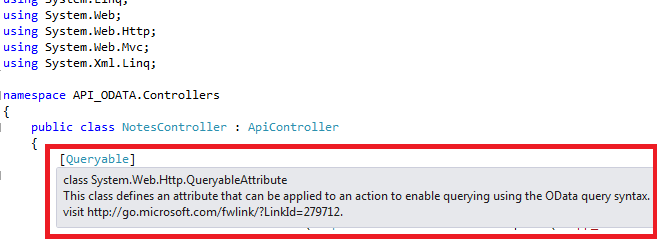
3) Step #3 : create an ApiController and set the "Queryable" attribute over the Action Methods : 


Why do we mark the Action Method as "Queryable"? That's the key to enable the OData HTTP Service: Take a look at the attribute's description:


Important:   The Action method's name MUST be set according to the HTTP verbs : Get for HTTP GET, Post for HTTP POST, and so on.

Now we get the data from the XML file, and return an IQueryable<> collection :
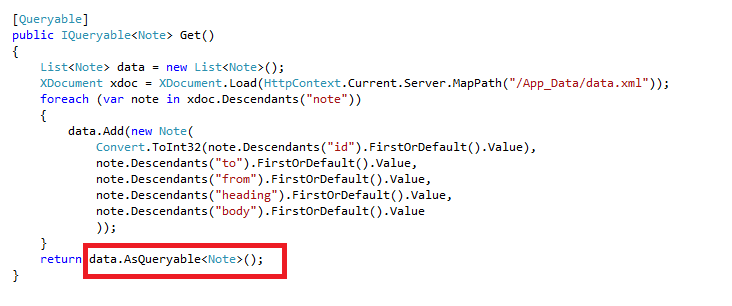
public class NotesController : ApiController
    {
        [Queryable]
        public IQueryable<Note> Get()
        {
            List<Note> data = new List<Note>();
            XDocument xdoc = XDocument.Load(HttpContext.Current.Server.MapPath("/App_Data/data.xml"));
            foreach (var note in xdoc.Descendants("note"))
            {
                data.Add(new Note(
                    Convert.ToInt32(note.Descendants("id").FirstOrDefault().Value),
                    note.Descendants("to").FirstOrDefault().Value,
                    note.Descendants("from").FirstOrDefault().Value,
                    note.Descendants("heading").FirstOrDefault().Value,
                    note.Descendants("body").FirstOrDefault().Value
                    ));
            }
            return data.AsQueryable<Note>();
        }
    }

At the code above, i remarked the most important points with red .

Finally, we set the route template at the WebApiConfig file :

That's all. Build & run the service :
Make a HTTP GET request using the OData protocol :


As you see, we have paging ($skip & $top) and sorting ($orderby) support : 


That's all
In this post we've seen how to setup an OData RESTful HTTP Service using the Web API  inside an Asp.Net MVC application , with support for GET operations. 

Happy programming.....
    By Carmel Shvartzman
כתב: כרמל שוורצמן

Saturday, August 16, 2014

Building Blocks - Gang of Four Decorator Pattern Simple Sample


A Decorator class is a class that extends the functionality of another class at run-time without inheriting it :  is one of the 23 software patterns researched by the Gang of Four in their 1995 classic book. The Decorator Pattern become really useful in an MVC application, when you want to add functionality to many classes , respecting the Open-Closed Software Principle, therefore without touching any existing code.
The Open-Closed Principle, stated by Meyer in 1988, specifies that any class once completed, could only be modified in order to fix errors, but any new or appended functionality would require an extension new class to be created.This pattern allows you to create absolutely loosely-coupled relationships between classes, since it works without the standard inheritance mechanism known as "sub-classing" : instead of extending functionality at compile time through a sub-class, the Decorator wraps another objects at a runtime dynamic basis.
This pattern is materialized using interfaces or abstract classes. In this example, we'll use an abstract class, because it will be preferable in real world applications (see this article comparing interfaces vs abstract classes).

The following lines contain the code for the Decorator. Just use it as a bootstrap in your Model's classes :

Suppose you have this given parent-child classes to be extended with a Decorator:

abstract class Parent
{
   public abstract void DoIt();
}


class Child : Parent
{
  public override void DoIt()
  {
    Console.WriteLine("You are at 
Child .DoIt()");
  }
}


And when called, the output will be :

Child child = new Child();
child.DoIt();

You are at Child .DoIt()

Step #1 : Create an abstract Decorator class:


abstract class DecoratorBase : Parent
{
  protected Parent component;

  public void Setup(Parent component)
  {
    this.component = component;
  }
  public override void DoIt()
  {
    if (component != null)
    {
      component.DoIt();
    }
  }
}

The abstract base decorator wraps the old class as a component, and overrides the methods to extend , simultaneously respecting the old functionality.

Step #2 : Create as many Decorators as you wish : 


class Decorator1 : 
DecoratorBase 
{
  public override void DoIt()
  {
    base.DoIt();
    ExtendedFunctionality();
    Console.WriteLine("You are at 
Decorator1 .DoIt()");
  }

  void 
ExtendedFunctionality()
  {
    // TODO
  }
}

The functional decorator does two things:
1) calls the method's base of the old class (through the abstract decorator)
2) adds new behavior to the old functionality 
Thus , the old class is now a component of the decorator. 

Call & output:

Child child = new Child();
Decorator1 dec1 = new 
Decorator1 ();

dec1.Setup(child);
dec1.DoIt();

You are at Child.DoIt()
You are at Decorator1 .DoIt()

Yet another Decorator :

class Decorator2 : DecoratorBase 
{
  public override void DoIt()
  {
    base.DoIt();
    ExtendedFunctionality();
    Console.WriteLine("You are at 
Decorator2 .DoIt()");
  }

  void 
ExtendedFunctionality()
  {
    // TODO
  }
}

Call and output:

Child child = new Child();
Decorator1 dec1 = new 
Decorator1 ();Decorator2 dec2 = new Decorator2 ();
dec1.Setup(child);

dec2.Setup(dec1);
dec2.DoIt();


You are at Child.DoIt()
You are at Decorator1.DoIt()

You are at Decorator2 .DoIt()


That means, with this design pattern we can not just decorate twice an old class, but also decorate another decorator, which now becomes a component of a newer decorator class.

Important:
We practically didn't touch the old code : the old class is now a component of the new decorator/s.
All we did was adding an abstract parent to the extended class, thus respecting the Open-Close Principle.

That's all!!  
Happy programming.....
        By Carmel Schvartzman
כתב: כרמל שוורצמן

Wednesday, August 13, 2014

Singleton Data Repository - Gang of Four Singleton Pattern Simple Sample


In this article we create a singleton Data Repository for MVC. A Singleton class is a class of which only a single instance can exist: is one of the 23 software patterns by the Gang of Four. The Singleton Pattern become really useful in an MVC application, because instead of re-creating the Repository 1) each time a request comes to the MVC app, and 2) also for every different user which browser to the site, it is created ONLY ONE time and kept for the whole lifetime of the MVC application, that means, until the IIS application pool is reset.
First i give you the whole c# code to create a Singleton Data Repository for Asp.Net MVC. It will be  connected to a single XML file , and will be exposing all CRUD operations, using the XDocument class. The basic class will be "Message", and the Repository , "IMessagesRepository". The initial XML file is placed at the end of this post, if you want to use it as bootstrap.
After giving you the Repository code for COPY-PASTE, we'll explain how it works, and we'll compare its behavior with a non-singleton MVC application.

  The whole application can show as follows (i'm using the Twitter Bootstrap: HERE you have a tutorial for installing it in 5 minutes):


This is the code for the Singleton Data Repository. Just COPY-PASTE it in your Models folder and use it inside the Controller: 


namespace RichFormApplication.Models
{

    public class Message
    {
        public int ID { get; set; }
        public string To { get; set; }
        public string Sender { get; set; }
        public string Title { get; set; }
        public string Contents { get; set; }
    }


    public interface IMessagesRepository
    {
        IEnumerable GetAll();
        Message Get(int id);
        Message Add(Message item);
        bool Update(Message item);
        bool Delete(int id);
    }


    public class MessagesRepository : IMessagesRepository
    {
        static private int test;
        private List<Message> Messages = new List<Message>();
        private int iNumberOfMsgs = 1;
        private XDocument doc;

        #region Singleton Init
        private static MessagesRepository _RepositoryInstance = new MessagesRepository();
        public static MessagesRepository RepositoryInstance
        {
            get
            {
                test = 1;
                return _RepositoryInstance;
            }
        }
        #endregion

        private MessagesRepository()
        {
            doc = XDocument.Load(HttpContext.Current.Server.MapPath("~/App_Data/data.xml"));
            foreach (var node in doc.Descendants("note"))
            {
                Messages.Add(new Message
                {
                    ID = Int32.Parse(node.Descendants("id").FirstOrDefault().Value),
                    To = node.Descendants("to").FirstOrDefault().Value,
                    Sender = node.Descendants("from").FirstOrDefault().Value,
                    Title = node.Descendants("heading").FirstOrDefault().Value,
                    Contents = node.Descendants("body").FirstOrDefault().Value
                });
            }

            iNumberOfMsgs = Messages.Count;
        }

        public IEnumerable GetAll()
        {
            return Messages;
        }
        public Message Get(int id)
        {
            return Messages.Find(p => p.ID == id);
        }
        public Message Add(Message item)
        {
            if (item == null)
            {
                throw new ArgumentNullException("item");
            }

            item.ID = iNumberOfMsgs++;

            XElement newNode = new XElement("note");
            XElement id = new XElement("id"); id.Value = item.ID.ToString();
            XElement to = new XElement("to"); to.Value = item.To;
            XElement from = new XElement("from"); from.Value = item.Sender;
            XElement Title = new XElement("heading"); Title.Value = item.Title;
            XElement Contents = new XElement("body"); Contents.Value = item.Contents;
            newNode.Add(id, to, from, Title, Contents);
            doc.Root.Add(newNode);
            SaveToXML();
            return item;
        }
        public bool Update(Message item)
        {            
            XElement Message = doc.Descendants("Message").Where(n => Int32.Parse(n.Descendants("id").FirstOrDefault().Value) == item.ID).FirstOrDefault();
            Message.Descendants("to").FirstOrDefault().Value = item.To;
            Message.Descendants("from").FirstOrDefault().Value = item.Sender;
            Message.Descendants("heading").FirstOrDefault().Value = item.Title;
            Message.Descendants("body").FirstOrDefault().Value = item.Contents;
            SaveToXML();
            return true;
        }
        public bool Delete(int id)
        {
            doc.Root.Descendants("note").Where(n => Int32.Parse(n.Descendants("id").First().Value) == id).Remove();
            SaveToXML();
            return true;
        }

        private void SaveToXML()
        {
            doc.Save(HttpContext.Current.Server.MapPath("~/App_Data/data.xml"));
        }
    }
}

Take a look at the red code : the steps for creating the Singleton are:
1) change the "public" for a "private" constructor;
2) declare a "public static" property which returns an INSTANCE of the class
3) that static instance will be created by the .Net CLR runtime , at the private static field containing the
         instance, at the precise instant in which someone calls at least one of the properties or methods
         of the class. The static instance of the class will survive for all lifetime of the MVC application.

To use the Repository just type the following code in the Controller:

        public ActionResult Index()
        {
            return View(MessagesRepository.RepositoryInstance.GetAll());
        }

Now let's test the singleton: browse to the website and put in debugger two breakpoints inside the Repository:


There is no initialization of the Repository , as it is static and its constructor is private.
You'll see that the first time some user browse to the site, the repository is initialized:


Try a second time, refreshing the web page: the repository will not be created again, because it already exists:


Try now as a new user, opening a second session in another browser tab, to see that you keep using the same repository as the first user does.

This is the XML initial file:


<?xml version="1.0" encoding="utf-8"?>
<notes>
  <note>
    <id>0</id>
    <to>Fry</to>
    <from>Leela</from>
    <heading>Reminder</heading>
    <body>Don't forget me this weekend!!!</body>
  </note>
  <note>
    <id>1</id>
    <to>Leela</to>
    <from>Fry</from>
    <heading>Finally!!!</heading>
    <body>Leela, have you asked permission from the Professor?</body>
  </note>
  <note>
    <id>2</id>
    <to>Fry</to>
    <from>Leela</from>
    <heading>Rejection</heading>
    <body>You know what? In second thoughts, i'm going out with Lars this weekend. Sorry...</body>
  </note>

</notes>

That's all concerning to the Singleton Repository.

If you are asking yourself about the XML related code, some relevant points about the XML include:
 We are using the Descendants("") method and the Load() method, for reading the XML file into memory and then inside the List<>.
The Get methods use Find(p => p):


To add a new node, we CREATE an XElement with all its XElement CHILDREN , and then add it to the ROOT (be careful adding them to the root) of the XDocument:


That's all!!  
Happy programming.....
        By Carmel Schvartzman
כתב: כרמל שוורצמן

Monday, August 11, 2014

What is Unobtrusive MVC Client Validation and How it works?


The MVC Client Validation model uses unobtrusive javascript to check the user input at the browser side. Using this feature you can create elegant MVC webpages where the HTML markup appears clear clean by its own, with no javascript codes embedded into it. All that's required is to declare at the MVC Model what are the Business Rules concerning each of the input fields. 
This way, not only we have a neat distinction between the Business Logic which resides in the Model, and the Presentation Layer dwelling at the View, but also we got simplified markup with no javascript validation code at all.
To achieve that, we keep the following  steps:
1) load the validation javascript files 
2) enable unobtrusive javascript at the web.config (or the View(or even programatically))
3) define all business logic as Data Annotations at the Model

In a few words, when we talk about unobtrusive javascript we mean that the scripts are not shown at all at the HTML markup level: all scripts reside in different files, and the markup contains just the HTML elements and it attributes, setting a clear separation between presentation and javascript code.
Using this MVC Client Validation mode, we have client side validation of a web form as this:


The validation will be showed this way:


VALIDATING A WEB FORM WITH UNOBTRUSIVE JAVASCRIPT


In order to validate this form, all we have to do is to follow this steps:

1) load the validation javascript files 

The client side validation is done by the jquery.validate* files : 


we need to have them defined at the BundleConfig.cs file: 


and then imported at our webpage:


2) enable unobtrusive javascript at the web.config (or the View(or even programatically))

We must enable client validation at the web.config:


Or elsewhere at the MVC View, as a per-page validation:


3) define all business logic as Data Annotations at the Model

Finally, we declare the validation rules at the Model, using Data Annotations:


And that's all: the data annotations will be translated by the MVC engine to attributes appended to the input controls as "data-val-*" :

As you can see at the html source of the MVC View, the "Title" field of our example gets the following validation attributes:

data-val="true" : means that this input control must be validated: the submit button will not be enabled
                                 until it's valid

data-val-length : if this attribute is present, its value represents a message to display if the length is not legal

data-val-required :  if this attribute is present, its value is the message to be displayed if no input was typed

data-val-length-min : if this attribute is present, its value is the message to be displayed if the input typed does not reaches the minimal length

data-val-length-max :  if this attribute is present, its value is the message to be displayed if the input typed is bigger than the maximal length

There are more Data Annotations, such as Editable, Compare, EmailAddress, Display, Phone, Range, RegularExpression, StringLength, Timestamp, Url, UIHint, or CustomValidation. In the MSDN website you can go deep inside Data Annotations

If you liked the appearance of this web form, a short tutorial on creating a rich form with the Twitter Bootstrap can be found here .  


Happy programming....
        By Carmel Schvartzman
עריכה: כרמל שוורצמן


Sunday, August 10, 2014

IIS SEO Toolkit - How to install, analyze and optimize your web site

In this article we'll see how to install and use the Microsoft IIS SEO (Search Engine Optimization) ToolKit to improve the ranking of your web site by search engine crawlers. This is a completely free tool which will help you to better rank your website with search engines, giving you a detailed analysis of the warnings and the errors found and the number of times they show in the web site, performance issues, duplicate files, codes  404 errors, broken links by page, slow pages arranged by directory and content type, redirects and Link depth.

We'll analyze an application as follows:


Browse to www.microsoft.com/web/seo and install the IIS SEO Toolkit :


Follow the install instructions, and after finishing, open the Tool found at the IIS 7.0 Extensions in All Programs :


You can also find the Toolkit at the IIS Manager window :


Open the "Site Analysis" feature to start a New Analysis: just type the name of the website and give a "Name" to the Report :


You'll be prompted a Dashboard:


The following is the "Summary" of the report, summarizing the Violations:


See the pages with more violations:


This is the counter of the kinds of violations:


The "Details" window can give you the load time of the page in milliseconds:

It is very important that you get and resolve the broken links in your website, because websites with broken links are fairly punished by the search engines:


Take a look at the slow pages and try to reduce overload on them:


At web page level, you are given a thorough analysis of all problems with the html:


The SEO Violations are deeply specified and the more important thing is, you are given the ways to resolve the issues, at the "Recommended Actions" panel :


In case you want to see specifically where in the HTML is situated the violation, open the Content tab :


Some important points respect the IIS SEO Toolkit are the following:

1) The summary window provides a detailed analysis of the warnings and the errors found and the number of times they show in the web site.

2) View the web page in Browser : right-click an URL and press "View in Browser".

3) View Web pages Linking to this Web Page : right-click and select "View Pages Linking to This Page", to show all web pages on your site linked to the selected item, and will be affected if you change the URL.

4) View Web Pages Linked by the current Page : this shows all the resources that your HTML markup references. 

5) The Violations section provides information about what pages have the most errors, arranged by error levels , and categorized by content, SEO, web mark up, and so on.

6) Web Page Word Analysis : at some selected web page "Details" window, open the tab "Word Analysis" to get the most commonly used words in the current web page, which is useful for describing the page to the search engines.

7) The IIS Toolkit analysis includes also performance, content, and links sections, containing their own full data. Here are some important points among those IIS Toolkit sections:
Duplicate files, with descriptions and keywords; Performance issues; Most linked pages; 404 errors; Broken links by page; Slow pages arranged by directory and content type; Redirects and Link depth.

It's also possible to export this data into an Excel file.

That's all!!  
Happy programming.....
        By Carmel Schvartzman
כתב: כרמל שוורצמן


Wednesday, August 6, 2014

Building Blocks: XML Data Repository for Asp.Net MVC with all CRUD Operations

The following code is the complete C# code to create an XML Data Repository for Asp.Net MVC with all CRUD Operations  , connected to a single XML file , and exposing all CRUD operations, everything using XDocument. The base class is "Note", and the Repository is "INotesRepository". A little XML bootstrap file is at the end of this post.
This code can also be downloaded from the following GitHub repository:
https://github.com/CarmelSoftware/MVCDataRepositoryXML
The whole application can show as follows:
Building Blocks: XML Data Repository for Asp.Net MVC with all CRUD Operations


Just COPY-PASTE it inside your Models folder and initialize it inside some Controller:


using System;
using System.Collections.Generic;
using System.Linq;
using System.Web;
using System.Xml.Linq;

namespace IoCDependencyInjection.Models
{

public class Note
{
public int ID { get; set; }
public string To { get; set; }
public string From { get; set; }
public string Heading { get; set; }
public string Body { get; set; }
}


public interface INotesRepository
{
IEnumerable
<Note> GetAll();
Note Get(int id);
Note Add(Note item);
bool Update(Note item);
bool Delete(int id);
}


public class NotesRepository : INotesRepository
{
private List
<Note> notes = new List<Note>();
private int iNumberOfEntries = 1;
private XDocument doc;

public NotesRepository()
{
doc = XDocument.Load(HttpContext.Current.Server.MapPath("~/App_Data/data.xml"));
foreach (var node in doc.Descendants("note"))
{
notes.Add(new Note
{
ID = Int32.Parse(node.Descendants("id").FirstOrDefault().Value),
To = node.Descendants("to").FirstOrDefault().Value,
From = node.Descendants("from").FirstOrDefault().Value,
Heading = node.Descendants("heading").FirstOrDefault().Value,
Body = node.Descendants("body").FirstOrDefault().Value
});
}

iNumberOfEntries = notes.Count;
}

public IEnumerable
<Note> GetAll()
{
return notes;
}
public Note Get(int id)
{
return notes.Find(p => p.ID == id);
}
public Note Add(Note item)
{
if (item == null)
{
throw new ArgumentNullException("item");
}

item.ID = iNumberOfEntries++;

XElement newNode = new XElement("note");
XElement id = new XElement("id"); id.Value = item.ID.ToString() ;
XElement to = new XElement("to");to.Value = item.To;
XElement from = new XElement("from"); from.Value = item.From;
XElement heading = new XElement("heading"); heading.Value = item.Heading;
XElement body = new XElement("body"); body.Value = item.Body;
newNode.Add(id, to, from, heading, body);
doc.Root.Add(newNode);
SaveXML();
return item;
}
public bool Update(Note item)
{
if (item == null)
{
throw new ArgumentNullException("item");
}
XElement note = doc.Descendants("note").Where(n => Int32.Parse( n.Descendants("id").FirstOrDefault().Value ) == item.ID ).FirstOrDefault();
note.Descendants("to").FirstOrDefault().Value = item.To;
note.Descendants("from").FirstOrDefault().Value = item.From;
note.Descendants("heading").FirstOrDefault().Value = item.Heading;
note.Descendants("body").FirstOrDefault().Value = item.Body;
SaveXML();
return true;
}
public bool Delete(int id)
{
doc.Root.Descendants("note").Where(n => Int32.Parse(n.Descendants("id").First().Value ) == id).Remove() ;
SaveXML();
return true;
}

private void SaveXML()
{
doc.Save(HttpContext.Current.Server.MapPath("~/App_Data/data.xml"));
}
}
}

This is the XML initial file:


<?xml version="1.0" encoding="utf-8"?>
<notes>
  <note>
    <id>0</id>
    <to>Fry</to>
    <from>Leela</from>
    <heading>Reminder</heading>
    <body>Don't forget me this weekend!!!</body>
  </note>
  <note>
    <id>1</id>
    <to>Leela</to>
    <from>Fry</from>
    <heading>Finally!!!</heading>
    <body>Leela, have you asked permission from the Professor?</body>
  </note>
  <note>
    <id>2</id>
    <to>Fry</to>
    <from>Leela</from>
    <heading>Rejection</heading>
    <body>You know what? In second thoughts, i'm going out with Lars this weekend. Sorry...</body>
  </note>

</notes>


Some important points are the XDocument utilization:
Building Blocks: XML Data Repository for Asp.Net MVC with all CRUD Operations 1
 We are using essentially the Descendants("") & the Load() methods, to read the XML document into memory and inside a List<>.
The Get method uses Find(p => p):

XML Data Repository for Asp.Net MVC with all CRUD Operations

To INSERT a new node, we CREATE an XElement with its inner XElement CHILDS , and then add it to the ROOT of the XDocument:

Data Repository for Asp.Net MVC


If you liked the look of this site, learn how to create it using open source CSS templates in this tutorial.

A Generic Data Repository is built step by step in the following Tutorial: http://themvcclub.blogspot.co.il/2014/06/generic-data-Repository-ASP.NET-MVC.html

A GitHub repository containing a Data Repository With Caching can be found here:
https://github.com/CarmelSoftware/Data-Repository-with-Data-Caching-in-ASP.NET-MVC-4

That's all!!  
Happy programming.....
        By Carmel Schvartzman
כתב: כרמל שוורצמן

Tuesday, August 5, 2014

Inversion of Control ( IoC ) Container - Step by step how to add to an MVC Application

In this article we'll see how to add an Inversion of Control ( IoC ) Container to an Asp.Net MVC Application , applying the Dependency Injection pattern.
In this tutorial we'll be using the Unity Application Block (Unity) container . This IoC container will allow us to perform a  dependency injection in our Controller class , in order to achieve a fully decoupled software design of our MVC App.
MVC loosely coupled applications are flexible, easy to test and easier to maintain.
Building loosely coupled applications means minimizing or just nullifying the dependencies between software objects. In our example, our Controller will have not knowledge at all of the Data Repository, and viceversa, and that means that we can in the future alter each one of them with no consequences for the other.The data will be displayed in the View as follows :


The complete documentation for the Unity open source software resides in Codeplex. It also includes a FREE ebook for you to deep in the issue:


When we talk about Inversion of Control we intend to express that instead that we control the data framework instantiating it in our Controllers, THE FRAMEWORK CONTROLS our controllers code by injecting itself into them. We don't initialize the framework, but it is alive and search the controllers in order to inject itself there. Then, when we come to test our MVC, we don't have to access the database because we don't have the framework constructor inside our controllers anymore. We can inject into them any test framework we want.
There are many IoC Containers, such as Castle Windsor, Spring.Net, Ninject and Unity by Microsoft. We are going to use this later.

The complete step by step stages for adding an IoC container to your MVC application are the following:

1) Install the Unity Block container using NuGet
2) Add an Unity Container .cs file (provided by the NuGet package) containing the code to build the container
3) Register your Data Repository type inside that code (in the BuildUnityContainer() method)
4) Setup the IoC Container in the Global.asax (calling the Initialize() method)
5) Inject the dependency in your Controller


1) Install the Dependency Injection Container using NuGet

Open the NuGet Manager and search for "Unity.MVC4", then install the package :


The package includes 2 assemblies and the "Bootstrapper" Container code file:


2) Add an Unity Container .cs file (provided by the NuGet package) containing the code to build the container 

This file is habitually provided in that package , but if don't, just create a .cs file with this code:


namespace IoCDependencyInjection
{
public static class IoC
{
public static IUnityContainer Initialise()
{
var container = BuildUnityContainer();

DependencyResolver.SetResolver(new UnityDependencyResolver(container));

return container;
}

private static IUnityContainer BuildUnityContainer()
{
var container = new UnityContainer();

// register all your components with the container here
// it is NOT necessary to register your controllers

// e.g. container.RegisterType<itestservice testservice="">();
container.RegisterType<INotesRepository, NotesRepository>(); 

RegisterTypes(container);

return container;
}

public static void RegisterTypes(IUnityContainer container)
{

}
}
}


(I changed the class name to "IoC")

3) Register your Data Repository type inside that code (in the BuildUnityContainer() method)

Then uncomment the code lines inside the BuildUnityContainer() method , and insert the Repository Interface and Class types:


// e.g. container.RegisterType<ITestService, TestService>();        container.RegisterType<INotesRepository, NotesRepository>();  

4) Setup the IoC Container in the Global.asax (calling the Initialize() method)


5) Inject the dependency in your Controller


private INotesRepository Repository;
        public IoCTestingController(INotesRepository rep)        {            Repository = rep;        }

That's all respecting to Dependency Injection & Inversion of Control.


Now, in order to finish building the MVC app, we need a Data Repository and a Controller with its Views.
First we'll need a Repository working on an XML file to store the data in, so build it with the code you'll find in this Building Block.

You'll also find there a small XML file to include in your application.

Now for the Controller, these are the methods using the Dependency Injection that we created :

CRUD OPERATIONS : 


CREATE :


RETRIEVE :


UPDATE :


DELETE :


After you finish your application , browse to the Views to see the List, Details, Edit & Delete screens:


If you liked the look of this site, learn how to create it using open source CSS templates in this tutorial.

That's all!!  In this tutorial we've learned how to add an Inversion of Control ( IoC ) Container to an Asp.Net MVC Application , applying the Dependency Injection pattern.
Happy programming.....
        By Carmel Schvartzman
כתב: כרמל שוורצמן