Thursday, May 28, 2015

jQuery Mobile App using Grids For Android and BlackBerry

Here we describe Step by step How to create a jQueryMobile App using Grids For Android and BlackBerry
In this post we'll build together in 20 minutes a small jQuery Mobile HTML5 App using Grids for all kind of Mobile Devices  : BlackBerry, Nexus , Acer , Nokia, iPad, iPhone, etc...
The source code for this tutorial is located in this GitHub repository:
https://github.com/CarmelSoftware/jQueryMobile_Grids
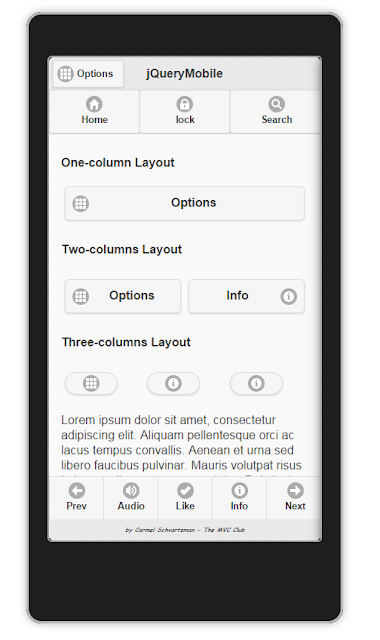
This small Mobile App looks like this:


And this is how it is displayed on a Mobile emulator:

jQuery Mobile App using Grids For Android and BlackBerry   1


jQueryMobile App using Grids For Android and BlackBerry 


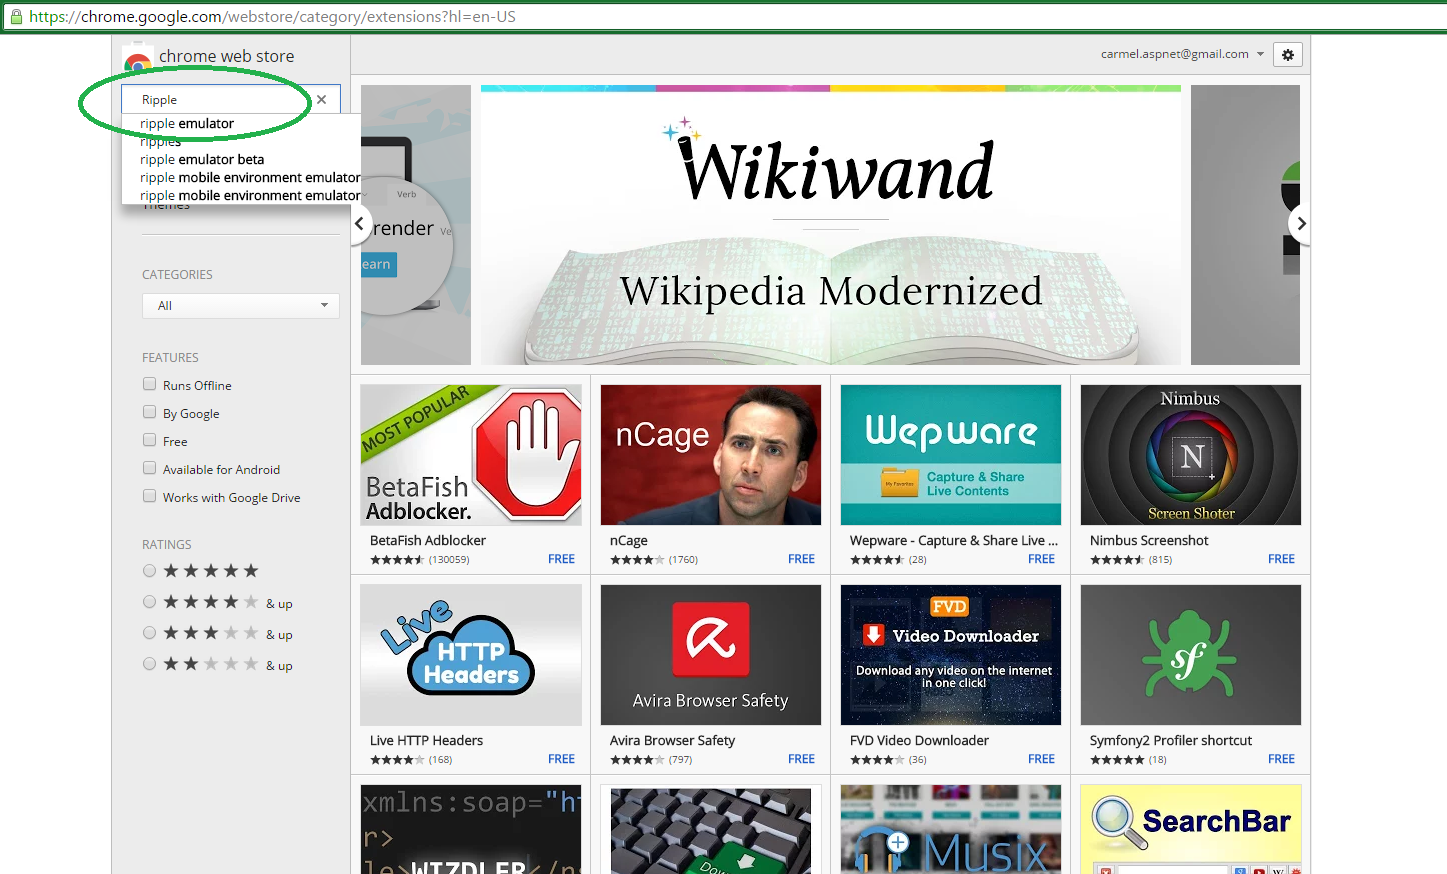
For this tutorial we will use the jQuery Mobile and  jQuery Frameworks, so browse to http://jquerymobile.com/ and to  jQuery official web site  . Then copy the URLs of the latest versions of the files on CDN  . We  will also use a Mobile Emulator,  so please refer to this 5 minutes tutorial on installing the Ripple Mobile Emulator.
There is   this "First jQueryMobile App" Tutorial. for a more detailed explanation on installing the frameworks and the emulator.

After you obtain the frameworks URLs, add them to the HTML5 file:

jQuery Mobile App using Grids For Android and BlackBerry  2

Then, add a data-role="page" and a data-role="header" :

jQuery Mobile App using Grids For Android and BlackBerry   3


1) Grid with 100% Column Width:


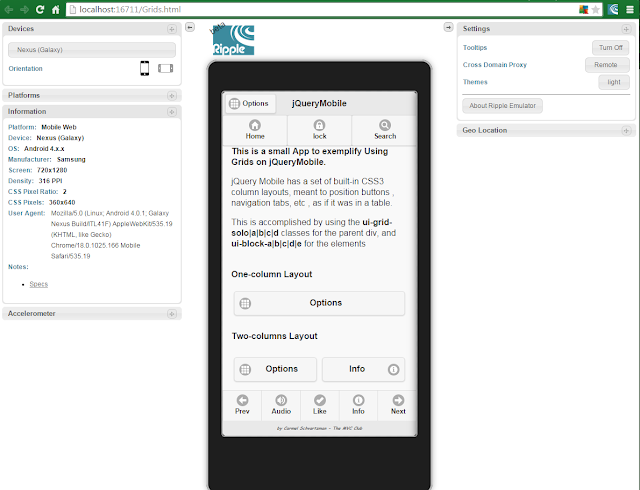
jQuery Mobile has a set of built-in CSS3 column layouts, meant to position buttons , navigation tabs, etc , as if it was in a table.
This is accomplished by using the ui-grid-solo|a|b|c|d classes for the parent div,
and ui-block-a|b|c|d|e for the elements.
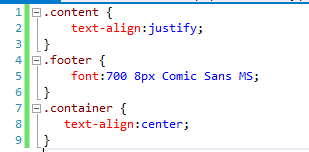
Inside the div that we wrote, that represents a Page of our jQueryMobile App , we insert another <div> in it , to be a Grid with only one compartment , using the class ui-grid-solo :
jQuery Mobile App using Grids For Android and BlackBerry   4


We use the  jQuery Mobile class ui-block-a to define a column to the left inside the Grid.
Inside, we add a button , with Icon, shadow and round corners, using the correspondant  jQuery Mobile classes.


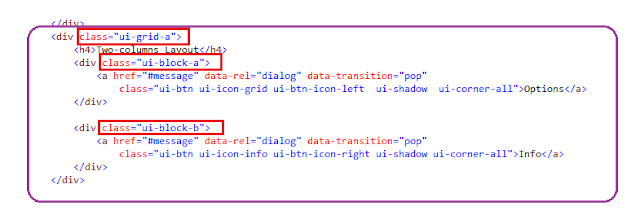
2) Grid with 50% - 50% Column Widths:


Now we create a Grid with two columns as follows :

jQuery Mobile App using Grids For Android


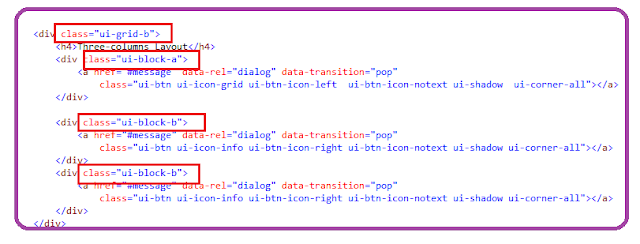
3)  Grid with 33% -  33% -  33% Column Widths:

Next, we add another Grid , this time for three columns, which is done this way :
jQuery Mobile App using Grids


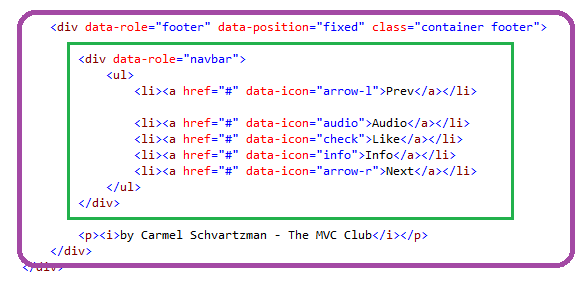
Finally, we append a Footer , in order to properly close this jQuery Mobile App, with a Navbar:


jQuery Mobile App using Grids For  BlackBerry

The complete list of Grid options can be found at the  jQuery Mobile official web site.

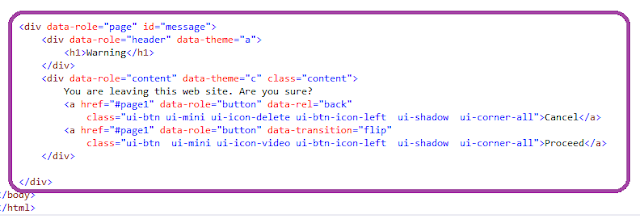
If you wish , you can also add a data-role="page" for the dialog that the buttons above open:


jQuery Mobile App using Grids For Android and BlackBerry


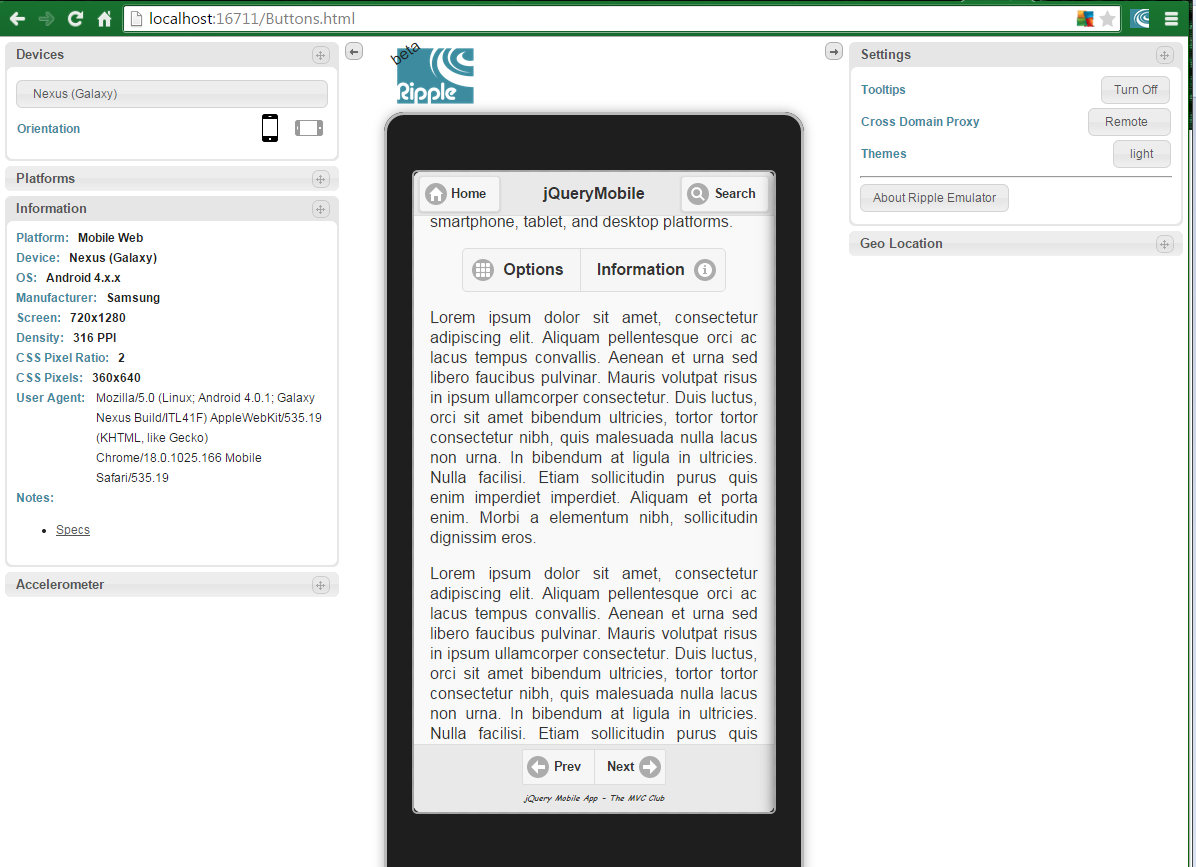
Now let's open the Ripple jQuery Mobile Emulator to see our App and to check it:


jQuery Mobile App using Grids 1


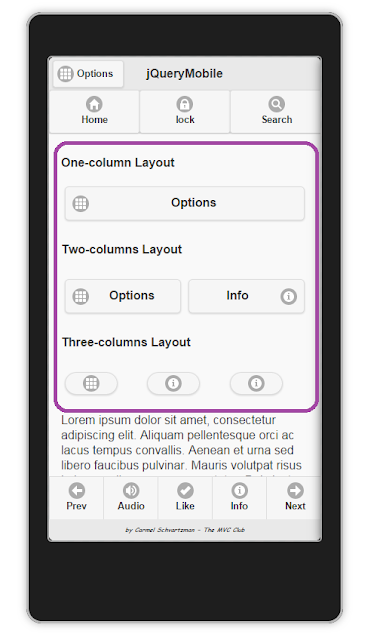
Here you see the One Column's Layout:

jQuery Mobile App using Grids For Android and BlackBerry


Here you see the Two Column's Layout and the Three Columns one:

 Mobile App using Grids For Android and BlackBerry


We customized this App by adding some style in a CSS3 file as follows:

.content {
    text-align:center;    
    font:900 30px Lucida Handwriting;
    font-style:italic;    
    background:#F0FFFF;
    color:#3399FF;
}
.footer {
    font:700 8px Comic Sans MS;
}
.container {
   text-align:center;
}


That's it....

Happy programming.....

      by Carmel Schvartzman


כתב: כרמל שוורצמן

Wednesday, May 27, 2015

jQueryMobile App using Navbars For Android and BlackBerry

In this post we describe Step by step How to create a jQueryMobile App using Navbars For Android and BlackBerry.
In this article we'll build from scratch in 20 minutes a small jQuery Mobile HTML5 App using Navbars at both  header and footer , for use on all kind of Mobile Devices  : Nexus Galaxy, BlackBerry, Acer , Nokia, iPad, iPhone, and more...
This Mobile App can be downloaded from the following GitHub repository:
https://github.com/CarmelSoftware/jQueryMobile_Navbars
This small Mobile App shows like this:
jQueryMobile App using Navbars For Android and BlackBerry

This is how it is displayed on the Ripple Mobile emulator:
jQueryMobile App using Navbars For Android and BlackBerry   1


jQueryMobile App using Navbars For Android and BlackBerry 


For this tutorial we will need the jQuery Mobile and the jQuery Frameworks, therefore go to http://jquerymobile.com/ and to  the  jQuery official web site  and copy the URLs of the latest version of the frameworks on CDN  . We  will also need a Mobile Emulator, for testing purposes, so please follow this 5 minutes tutorial on installing the Ripple Mobile Emulator.
There is a more detailed explanation on installing the frameworks and the emulator,  at this "First jQueryMobile App" Tutorial.  :

After you got the frameworks, add the references to a new HTML5 file:
jQueryMobile App using Navbars For Android and BlackBerry    2


1) Header's Navbar with Shadows and Round Corners:


Write a div to be a Page of our jQueryMobile App , and insert another <div> in it , to be its Header:

jQueryMobile App using Navbars For Android and BlackBerry   3


We use the data-role jQuery Mobile directive to define a "navbar" inside the Header.
This Navbar will hold a <ul> list which its <li> list items will contain jQuery Mobile Buttons , based on <a> hyperlinks.
Also, we add to the three buttons , Icons, shadows and round corners, using jQuery Mobile classes.
Next, if you like, add some text to the page, and some more buttons:
jQueryMobile App using Navbars For Android and BlackBerry   4


2) Footer's Navbar with Horizontal Grouping, Icons , Shadows and Round Corners:

Next, we add a Navbar to the Footer, which is a fixed footer :

jQueryMobile App using Navbars For Android and BlackBerry   5

Again, we create a <ul> list with some <a> buttons in it. They will have icons, defined with the data-icon directive.
But this time we do not add shadows nor round corners, to attain a more compact group of Navbar buttons.
The complete list of icons can be found at the  jQuery Mobile official web site.


We used the data-position "fixed" directive at the header and the footer, in order to stuck them while the user is scrolling the page.  

Now let's open our jQuery Mobile App in the Ripple emulator to check it:


jQueryMobile App using Navbars For Android

jQueryMobile App using Navbars For Android and BlackBerry
 As you can see, the Navbar at the Header has shadows and round corners, making it more appealing and good looking:
jQueryMobile App using Navbars
 The Footer Navbar that we did , contains five buttons with icons, but we refused to add shadows and round corners. However, it looks very nice either:
jQueryMobile App


For customizing this App we added some style in a CSS file as follows:


jQueryMobile App  Buttons


That's it....Hope you've enjoyed this article  ,

Happy programming.....

      by Carmel Schvartzman


כתב: כרמל שוורצמן

Tuesday, May 26, 2015

How to Remove unused references from C sharp projects in Visual Studio

In this tutorial we describe Step by step How to Remove unused references from C sharp projects in Visual Studio .
We'll use a free tool which can be downloaded from the Visual Studio Gallery Extensions Tools:
The snapshot below is an example of removing unused references from a MVC C# application :
  How to Remove unused references from C sharp projects in Visual Studio


How to Remove unused references from C sharp projects in Visual Studio


As said before, go to the  Visual Studio Gallery and download the tool:
  Remove unused references from C sharp projects in Visual Studio

After downloaded, install it:

  unused references from C sharp projects in Visual Studio


Finished the installation, open the install Log :

  How to Remove  references from C sharp projects in Visual Studio

As you can see, the tool will search all Visual Studio products in your machine, and will install itself only in the VS 10.00 versions:

  How to Remove unused references  C sharp   Visual Studio
 Take a look at the projects menu:

  How to Remove unused references from   Visual Studio

After the setup, you will see another menu inviting to remove references.
Finished the setup, you can see that the tool has been added to Visual Studio:

  How to Remove unused references


Now you have a new option at the menu:

  How to Remove unused references from C sharp projects

To test the tool, create a vanilla MVC C# project, and take a look at the assemblies:

  How to Remove unused references from C sharp projects in Visual Studio  1

Run the tool from the menu, to see the references removed:

  How to Remove unused references from C sharp projects in Visual Studio  2

Now there remained only the required assemblies to run the application:

  How to Remove unused references from C sharp projects in Visual Studio  3


That's all. We hope that this tool will be useful to you.

Happy programming.....

      by Carmel Schvartzman


כתב: כרמל שוורצמן


Thursday, May 21, 2015

jQueryMobile App using header and footer Buttons For Android and BlackBerry

In this post we describe Step by step How to create a jQueryMobile App using header and footer Buttons For Android and BlackBerry.
In this article we build from scratch in 20 minutes a small jQuery Mobile HTML5 App using Buttons with Grouping , icons , header and footer buttons , fixed positions  , for use on all kind of Mobile Devices  : Nexus Galaxy, BlackBerry, Acer , Nokia, iPad, iPhone, and more...
This Mobile App shows like this:
jQueryMobile App using header and footer Buttons For Android and BlackBerry

jQueryMobile App using header and footer Buttons For Android and BlackBerry   1


jQueryMobile App using header and footer Buttons For Android and BlackBerry 


The complete code for this App can be downloaded from this GitHub rep:
https://github.com/CarmelSoftware/jQueryMobile_Buttons


We need the jQuery Mobile and the jQuery Frameworks, so go to http://jquerymobile.com/ and to  the  jQuery official web site  to get the latest version of the frameworks on CDN  . Also we  need a Mobile Emulator, to test our App on different Mobile devices. Follow this 5 minutes tutorial on installing a Mobile Emulator.
A more detailed explanation on downloading the frameworks and emulator, can be found at this "First jQueryMobile App" Tutorial.  :

jQueryMobile App using header and footer Buttons For Android and BlackBerry   2


1) Header's Buttons with Icons , Shadows and Round Corners:


Let's write a div to hold the first Page of our jQueryMobile App , beginning with its Header:
jQueryMobile App using header and footer Buttons For Android and BlackBerry   3

Use the data-role jQuery Mobile directive to define a Page and a Header.
We add here two buttons with Icons, shadows and round corners.

2) Content's Buttons with Horizontal Grouping, Icons , Shadows and Round Corners:

Next, we create the content of the Page, grouping two buttons using the data-role "controlgroup" directive and data-type "horizontal" (you can use also the "vertical" option) :

jQueryMobile App using header and footer Buttons For Android and BlackBerry  4


Notice that at the Header we use the data-position "fixed" directive, for fixing the header while the user is scrolling the page. For demonstrating this, add some text to the contents:


jQueryMobile App using header and footer Buttons For Android and BlackBerry   5


3) Footer's Buttons with Horizontal Grouping, Icons , Shadows and Round Corners:

Now we do the same at the Footer of the App, grouping two buttons with icons, shadows and round corners:

jQueryMobile App using header and footer Buttons For Android

4) PopUp Dialog's Buttons with Icons , Shadows and Round Corners:

Finally, we can create a Dialog to be displayed as a PopUp, with buttons with transitions, icons, shadows etc.

jQueryMobile App using header and footer Buttons


For this App we added some style in a CSS file as follows:


jQueryMobile App  Buttons


Now let's try our Mobile App:

jQueryMobile App  Buttons For Android and BlackBerry


The dialog popup:

jQueryMobile App using   Buttons For Android


Scrolling the page down:


jQueryMobile App

That's it....Hope you've enjoyed this article  ,

Happy programming.....

      by Carmel Schvartzman


כתב: כרמל שוורצמן

Wednesday, May 20, 2015

How to install the Ripple Mobile App Emulator for Android BlackBerry Nokia iPad iPhone in 5 minutes

In this post we describe Step by step How to install the Ripple Mobile App Emulator for Android BlackBerry Nokia iPad iPhone in 5 minutes.
In this article we install a Mobile Emulator for use on the kind of Mobile Device that you wish: Nexus Galaxy, BlackBerry, Acer , Nokia, iPad, iPhone, and more...
Ripple is multi-platform aimed to mobile HTML5 application development and testing.
This jquery Mobile Emulator looks as the following:

How to install the Ripple Mobile App Emulator for Android BlackBerry Nokia iPad iPhone in 5 minutes

How to install the Ripple Mobile App Emulator for Android BlackBerry Nokia iPad iPhone in 5 minutes  1

How to install the Ripple Mobile App Emulator for Android BlackBerry Nokia iPad iPhone in 5 minutes   2


How to install the Ripple Mobile App Emulator for Android BlackBerry Nokia iPad iPhone in 5 minutes 


You can get and run the code for the jQuery Mobile App showed above, from this GitHub rep:
https://github.com/CarmelSoftware/jQueryMobile_PaginationAndButtons

Ripple is browser agnostic. However, here we'll be installing it on Chrome.
Open the Chrome Webstore and make a search for the FREE "Ripple" Emulator:

How to install the Ripple Mobile App Emulator for Android BlackBerry Nokia iPad iPhone in 5 minutes   3


At the moment of writing this post, there is a "Beta" version of the Ripple Emulator. But it is being tested and it responds very well. Take a look at the feedbacks: by now, more than 500 web developers have rated this beta version with 4 stars. So go ahead and install this Chrome extension 

How to install the Ripple Mobile App Emulator for Android BlackBerry Nokia iPad iPhone in 5 minutes  4

After the installation, open some jQuery Mobile App url. The emulator will respond with this screen:


How to install the Ripple Mobile App Emulator for Android BlackBerry Nokia iPad iPhone

This will be just the first time that you use Ripple. The emulator wants to know your preferences. You can just click on the default option ("Mobile Web").

Next, check that the "Allow access to file URLs" option is enabled in Chrome:

How to install the Ripple Mobile App Emulator for Android BlackBerry Nokia

Finally, you can test your Mobile App with plenty of different devices :


How to install the Ripple Mobile App Emulator for Android

You can choose for a "Dark" or a "Light" background also:

How to install the Ripple Mobile App Emulator


That's it.... 
Happy programming.....

      by Carmel Schvartzman


כתב: כרמל שוורצמן